Thursday, February 1, 2018

Zuzka Light's 9-Move Post-Workout Stretching Routine

Zuzka Light's 9-Move Post-Workout Stretching Routine

Not sure which stretches to do after a workout? Follow Zuzka Light's full-body stretching routine! It's so great you'll want to implement it after your next training session!


Vital Stats

Even though we know it's important to stretch after a good workout, many of us finish our last set and leave without doing it. Like any magnificent engine, our bodies crave a proper cool-down after running full throttle. After a pounding, your muscles need a little loving.


Post-workout stretching is a healthy habit to develop. It gives the most important muscle of all, your heart, time to come back down to its normal speed. It also helps your muscles maintain and even increase their flexibility over time. Flexible muscles are often healthier and less injury-prone, and can move through a full range of motion much easier than inflexible ones.


I'd like to walk you through my favorite stretching routine. I like to do this routine after I work out. It only takes about 10-15 minutes. Afterward, I feel great!


The next time you finish a workout and want to do a stretching routine, try this one.


Start with this yoga pose. Stand tall with your feet hip-width apart and your chest up. Inhale and reach your arms up over your head. Bring your arms back down. As you do, bend forward with a flat back. Keep your back flat as you bring your hands to the floor. Look at your knees and exhale.


Sun Salutation

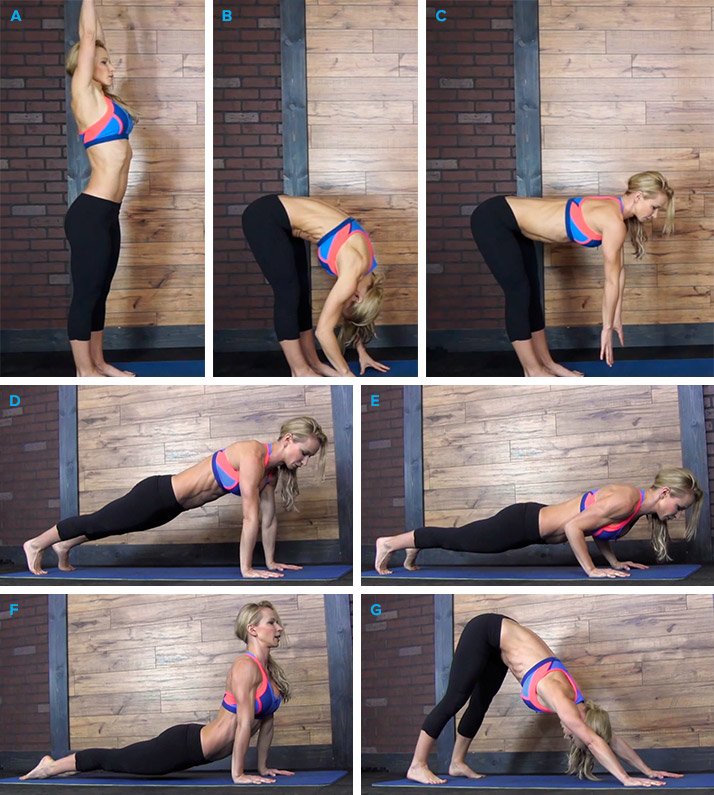
Inhale and come up with a flat back until your torso is parallel to the ground, then bring your hands back down and move into a plank. If you're in a good plank position, your body should be in a straight line, your hands directly underneath your shoulders. Inhale, and then exhale as you bend your elbows and lower down into Chaturanga (low push-up position.) Inhale, and then exhale into upward dog, as you squeeze your glutes. While you're in upward dog, roll your neck a little to loosen it.


Bring your toes back under, push your hips up, and move into downward dog. Keep your back straight, press your chest to your thighs. Try to bring your heels to the ground. If your heels don't reach the ground, stretch your calves by moving your feet up and down. Relax your neck and continue to lift your tailbone toward the ceiling.


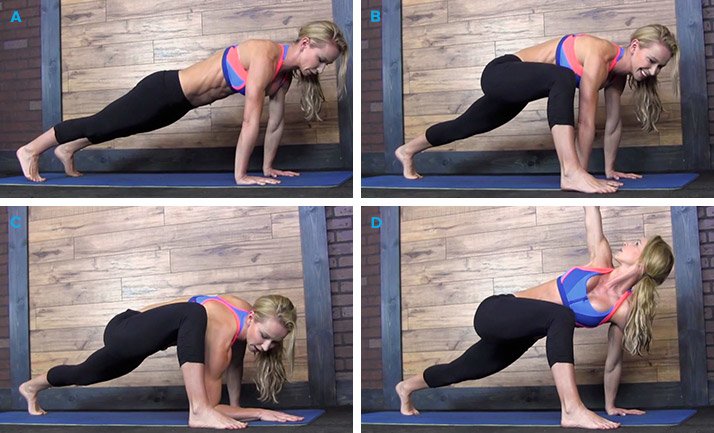
From downward dog, move back into a plank position. From the plank, step forward with your right foot and move it to the outside of your right hand. Bring your right elbow and forearm as low as possible. Hold for 5-10 seconds. Then, stretch your right hand up toward the ceiling and look at your hand. Try to turn your upper spine as much as you can while maintaining your lower body-lunge position and your arm in the air. Your left arm should be straight and in line with your right hand. Hold your right hand in the air for about 10 seconds, then bring it back down until your elbow and forearm touch.


Repeat two more times.


Triangle pose variation

After you've gone through the triangle pose variation three times, move back into the plank position. From there, step your right foot forward so it's between your hands. Push off your hands and stand up. You should end up in a lunge position. Bring the left knee down; the left shin should also be on the ground.


Quad stretch

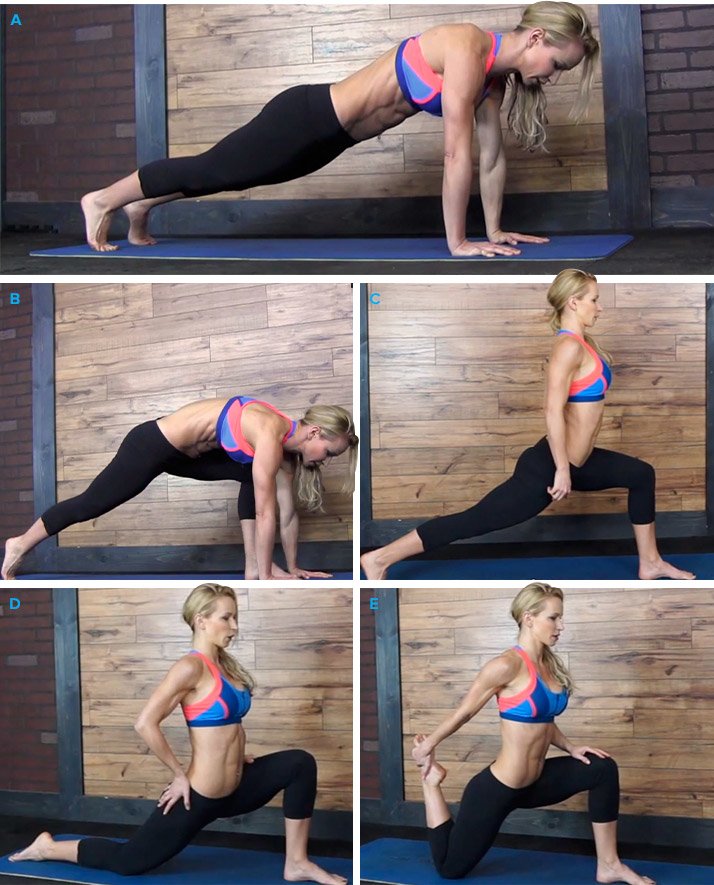
From there, reach back with your left hand and pull your left foot up toward your butt. Bring it as far as it can come comfortably. Don't hyperextend your lower back. Push your hips forward. Hold the stretch for 10-15 seconds.


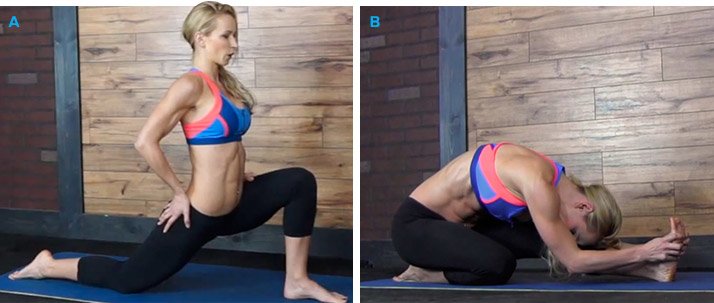
Let go of the left foot and sit back onto that left heel. Your right leg should remain straight. Flex your right foot so your toes are in the air. Bend forward as much as you can comfortably. If you can, try to touch your forehead to your leg. Breathe. Your hands should be on either side of your right leg, or you can grab on to your right foot. Hold this position for 10-15 seconds.


Hamstring stretch

Sit up off of your left leg and bring your right leg back. Move back into a plank position. Inhale and lower back down into Chaturanga and exhale into upward dog. Inhale and move into downward dog.


Switch sides and repeat. Step forward with your left foot and repeat the triangle pose, quad stretch, and hamstring stretch on the opposite side. Once you've completed all the movements again, move back into plank.


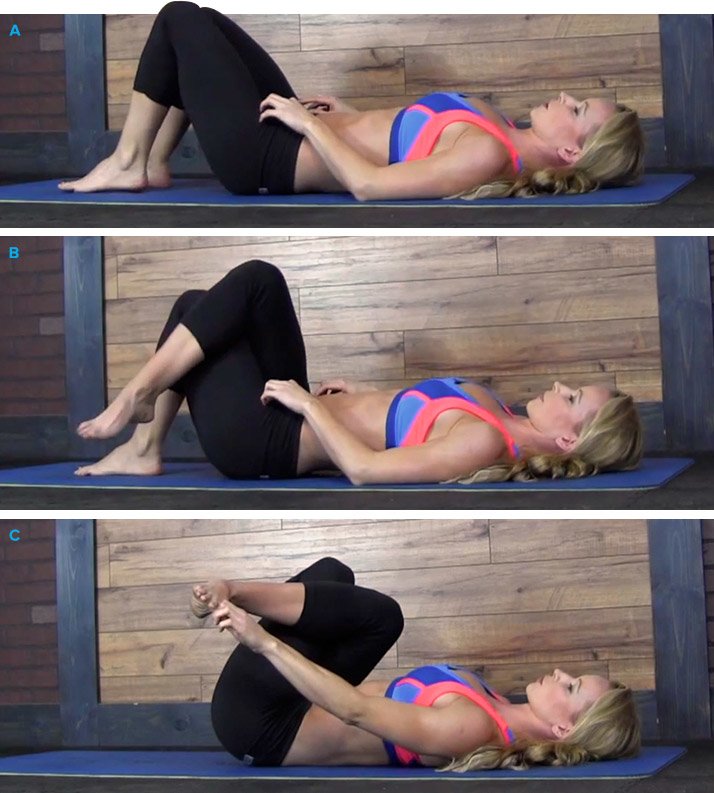
Lie down and roll over onto your back. Bring knees up, but keep your feet together. Cross your right foot over your left knee. Your shin, not your ankle, should be touching your left leg. Keep your shoulders on the ground.


Hip opener

Reach up and grab your left thigh with both arms. Your left arm will be in between your left and right thighs. Pull your left thigh into your chest. Keep both feet flexed. If you need an extra stretch, push your right elbow into your right thigh so it goes away from you. Breathe. Hold for 10-15 seconds. Release and put both feet back on the floor.


Switch legs and repeat the stretch by crossing your left thigh over you right leg and puling your right thigh toward your chest. Hold for 10-15 seconds.


When you're done, release and bring both feet to the ground.


Stay flat on the ground with your knees bent. Cross your right leg over your left thigh and bring both feet up and off the ground. Reach up and grab your right toes with your left hand and your left toes with your right hand. Lie back onto the ground and keep your shoulders down. Pull on your toes and try to bring your knees as close to your chest as you can. Hold for 10-15 seconds


Switch legs by crossing your left leg over your right thigh. Hold for 10-15 seconds. Breathe. Release.


Glute stretch

Lay completely flat on the ground with your legs extended. Bend your right leg, pull your knee to your chest, and put it over your left leg. Keep the left leg straight. Bring that right knee all the way to the ground but keep your right ankle on your left leg. You will roll up onto your left hip a little, but try to keep your shoulders on the ground.


Spine stretch

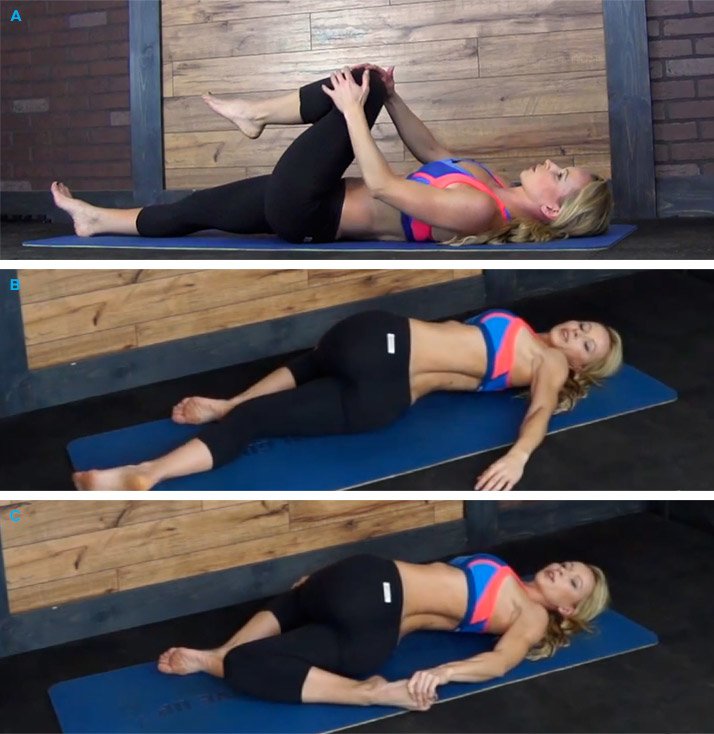
Look to your right, bend your left leg, and use your right hand to pull the left foot up toward your glutes. Use your left hand to keep your right knee on the ground. Hold for 10-15 seconds. Breathe deeply.


Release your left foot and slowly move back into the starting position. Do the stretch on the other side by putting your left knee over your right. Hold for 10-15 seconds.


Lay down with your legs on the ground and your arms extended over your head. Inhale as you sit up with your hands in the air. Immediately bend forward and bring your chest to your knees. Try to grab your feet with your hands. If you can't, bend forward as much as you can. Hold for a few seconds.


Flexion

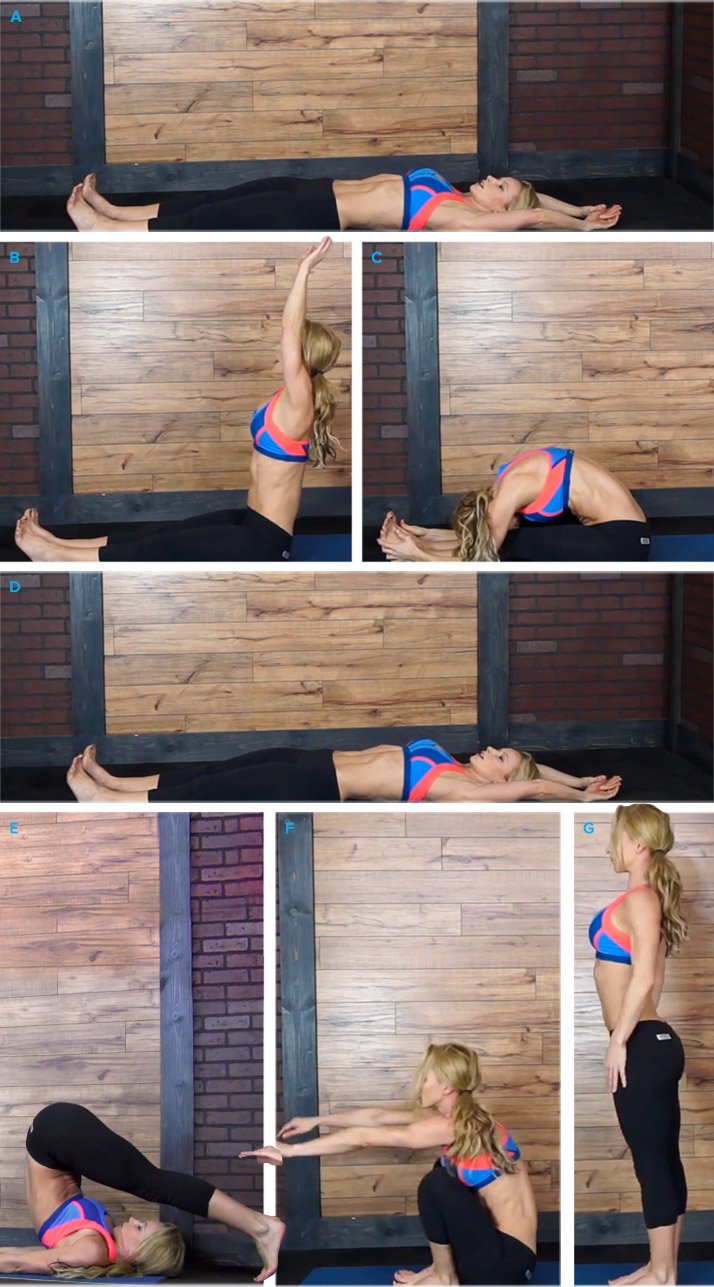
Release your feet and lay back on the ground with your arms at your sides. When your shoulders hit the ground, bring your feet up and over your head. Try to keep your legs straight. Your palms should remain on the ground. If you can, try to reach your toes to the floor above your head. Hold this position for 5-10 seconds.


Breathe in, release your legs back to the ground, and roll up into a standing position. Try to roll up and stand up without using your hands.


For the final stretch, stand with your feet together and your shoulders tall. Inhale and bring your arms up. Exhale and bring your arms down. Reach behind your back with your right arm and grab your left biceps.


Chicken wing

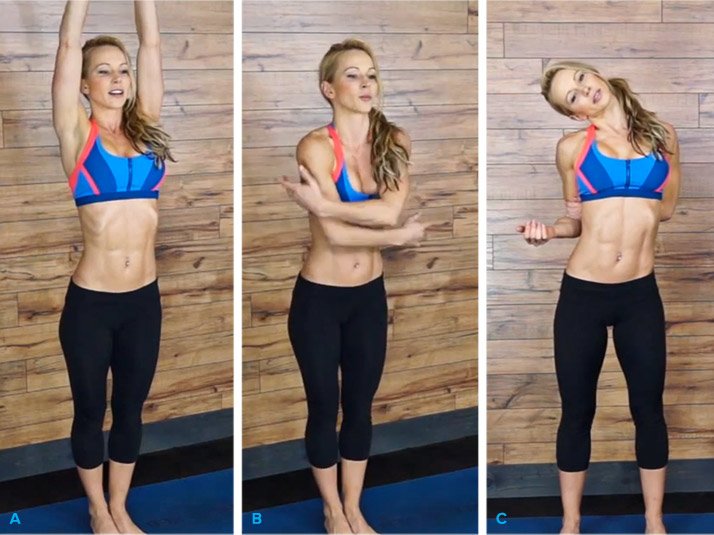
Keep your left arm bent and pull it up and forward. Let your head hang toward your left shoulder. You should feel a stretch on the right side of your neck. Hold for 10-15 seconds. Switch sides and hold for another 10-15 seconds.


How do you feel? After going through these stretches, you should feel limber, relaxed, and totally ready to take on whatever's next in your day!


For more routines like this every day, join my ZGYM.


Original article and pictures take www.bodybuilding.com site

Thursday, January 18, 2018

You're 14 Moves Away From The Perfect Bubble Butt

You're 14 Moves Away From The Perfect Bubble Butt
jen-selter

Great butts are NOT just for swimsuit season, ladies! Don’t get lazy just because you haven't had to strut around in a bathing suit in a while. Check out the Booty Inferno video above or these exercises for your butt below. Whether you're are at the gym, the park or your house, the following moves will work your glutes so you can break out the yoga pants, leggings and shorts with no regrets. Time to do some booty work!


1. Tip Toe Plié Squat:


Tip-Toe-Squats GROUPED

Squats are a must-do exercise to earn your bubble butt, and this move puts a new twist on the traditional squat. The most important part of this exercise is posture! Learn how to do this move by clicking here.


2. Jumping Lunges:


Jumping Lunges Grouped

This exercise is a bouncier modification of the traditional lunge and it is sure to get you on your way to the perfect bubble butt. See the steps by clicking here.


» Pro tip: If the jump is just too hard on your knees, take a small step in between each lunge to take the weight off!


3. Lunges:


reverse-lunge

Here's another must-do exercise to tighten your glutes! Correct posture is always important; learn how to correctly lunge here.


» Pro tip: Want to really feel the burn? Add some dumbbells or try the Leaning Lunge Combo or Reverse Lunge Twist with Weighted Ball.


4. Straight Leg Pulse:


quaduped-with-leg-lift RESIZED

Get down on your hands and knees with your directly underneath your shoulders. Your knees should be hip-width apart and bent at 90 degrees. Tighten your core and extend one leg completely behind you to raise it to hip height, using your core to maintain stability. Lift leg as high as you can while keeping hips neutral. Then, lower the leg to hip level. Quickly pulse your leg for 15-20 reps. Remember to keep your spine straight and your stomach tight. Complete three sets on each leg.


5. Wall Sit:


wall-sit_RESIZED-1
Don't let the word "sit" throw you off, this move will have you feeling the burn!

Click here to learn more about the wall sit.


» Pro tip: If you need an extra challenge, lift one leg and hold it straight out in front of you as you sit. Switch legs every 15 seconds.


6. Glute Bridge:


glute-bridge

Be sure to add this move to your routine if you're looking to tone your tush! If you want an added challenge, try lifting one leg as you lift your hips. See how to do a glute bridge by clicking here.


7. Dumbbell Deadlifts:


435fe516730388b8 Deadlifts
(Photo: POPSUGAR.com)

Not only does this exercise tone your butt, but the dumbbells also work your arms. Two benefits in one move! Learn more about dumbbell deadlifts here.


8. Frog Jumps:


Frog Jumps

Get moving and feel the burn with these frog jumps! See how to get hopping by clicking here.


9. Plié Squat with Body Bar:


Stand with your feet shoulder-width apart, with your toes facing outward. Perform a squat with your knees pointing outward, holding your chest up and back straight. Click here for more details.


plie-squat-with-bar GROUPED

10. Superman:


Superman

This Superman move will give you a Superwoman bubble butt! Learn more about this move by clicking here.


11. Plank Leg Triangle:


Plank-Leg-Triangle Grouped

Here's another compound exercise. The Plank Leg Triangle works your glutes and thighs, while the plank puts your arms and core to work! Click here to see how to do this move.


» Pro tip: you can also perform this move in forearm plank position.


12. Frog Lifts:


Frog Lift With Squishy Ball RESIZED-1
This exercise will tone your tush, you can do it with or without the squishy ball!

Learn how to do this move here.


Weighted-Plie-Squat_Grouped

Original article and pictures take media.womanista.com site

Tuesday, January 9, 2018

Your Weekly Workout Schedule Is Here — With Printables and Everything!

Your Weekly Workout Schedule Is Here — With Printables and Everything!
Add Some Weights to Your Arms and Abs Workout

Ready to feel ab-tastic? Reach for a set of medium-size weights to work both the arms and the core.


Click here for a printable PDF version of the workout.


Original article and pictures take media1.popsugar-assets.com site

Thursday, December 21, 2017

Your 12-Week Daily Bulking Trainer - Series Overview

Your 12-Week Daily Bulking Trainer - Series Overview

Jump To A Page ---------------- Series Main Page Series Overview Getting Started ---------------- Week 1 Week 1, Day 1 - Upper Body A Week 1, Day 2 - Lower Body A Week 1, Day 3 - Caloric Intake Week 1, Day 4 - Upper Body B Week 1, Day 5 - Lower Body B ---------------- Week 2 Week 2, Day 6 - Upper Body A Week 2, Day 7 - Lower Body A Week 2, Day 8 - Choosing Foods: Proteins Week 2, Day 9 - Upper Body B Week 2, Day 10 - Lower Body B ---------------- Week 3 Week 3, Day 11 - Upper Body A Week 3, Day 12 - Lower Body A Week 3, Day 13 - Choosing Foods: Carbs Week 3, Day 14 - Upper Body B Week 3, Day 15 - Lower Body B ---------------- Week 4 Week 4, Day 16 - Upper Body A Week 4, Day 17 - Lower Body A Week 4, Day 18 - Choosing Foods: Fats Week 4, Day 19 - Upper Body B Week 4, Day 20 - Lower Body B ---------------- Week 5 Week 5, Day 21 - Upper Body A Week 5, Day 22 - Lower Body A Week 5, Day 23 - Foods & Cooking Basics Week 5, Day 24 - Upper Body B Week 5, Day 25 - Lower Body B ---------------- Week 6 Week 6, Day 26 - Upper Body A Week 6, Day 27 - Lower Body A Week 6, Day 28 - Eating at Restaurants Week 6, Day 29 - Upper Body B Week 6, Day 30 - Lower Body B ---------------- Week 7 Week 7, Day 31 - Upper Body A Week 7, Day 32 - Lower Body A Week 7, Day 33 - Cardio While Bulking Week 7, Day 34 - Upper Body B Week 7, Day 35 - Lower Body B ---------------- Week 8 Week 8, Day 36 - Upper Body A Week 8, Day 37 - Lower Body A Week 8, Day 38 - Warming Up & Stretching Week 8, Day 39 - Upper Body B Week 8, Day 40 - Lower Body B ---------------- Week 9 Week 9, Day 41 - Upper Body A Week 9, Day 42 - Lower Body A Week 9, Day 43 - Sleep & Recovery Week 9, Day 44 - Upper Body B Week 9, Day 45 - Lower Body B ---------------- Week 10 Week 10, Day 46 - Upper Body A Week 10, Day 47 - Lower Body A Week 10, Day 48 - Supplements Week 10, Day 49 - Upper Body B Week 10, Day 50 - Lower Body B ---------------- Week 11 Week 11, Day 51 - Upper Body A Week 11, Day 52 - Lower Body A Week 11, Day 53 - Injuries & Setbacks Week 11, Day 54 - Upper Body B Week 11, Day 55 - Lower Body B ---------------- Week 12 Week 12, Day 56 - Upper Body A Week 12, Day 57 - Lower Body A Week 12, Day 58 - Tracking Progress Week 12, Day 59 - Upper Body B Week 12, Day 60 - Lower Body B


Bodybuilding.com presents your 12-Week Daily Bulking Trainer! Day by day, we'll help you build lean mass and forge a ripped, defined physique. You'll learn about setting goals, training for extreme muscle growth, following a proper nutrition plan, bulking supplementation, and staying motivated. All the knowledge you need to succeed is at your fingertips.


Overview


Welcome to the Bodybuilding.com 12-Week Daily Bulking Trainer, your solution to building lean muscle the right way!


Total Calories: 15 Calories / Pound of Body Weight


Protein: 1 Gram of Protein = 4 Calories

You should take in 1 gram of protein per pound of bodyweight.


Fats: 1 Gram of Fats = 9 Calories

You should take in .5 gram of healthy fats per pound of bodyweight.


Carbs: 1 Gram of Carbs = 4 Calories

The rest of your calories should come from carbs.


Supplements will never replace training, rest and proper nutrition. But they can help you reach your goals as quickly as possible. Without your hardwork supplements won't work.


The best supplements to start with are:


You should also consider performance supplements such as:


An all inclusive pre-workout supplement is also vital. Last but not least are BCAA's which are great for muscle recovery.


Maximize your results and prevent injury by stretching every day.


Whenever you are at the gym there are a few things you're going to want to have with you:


Original article and pictures take www.bodybuilding.com site

Wednesday, December 6, 2017

You Might Also Like

You Might Also Like
Collect

Collect

Collect

Close


Original article and pictures take indulgy.com site

Thursday, November 30, 2017

Yoga Time – Workout for Beginners

Yoga Time – Workout for Beginners
Yoga Time - Workout for Beginners

Today is yoga day at SkinnyMs. Fitness. It’s important to take a day to stretch, work on balance and relax your mind & body. I’ve chosen a full yoga session for beginners. You will need water and a yoga mat. Namaste!


This class is 20 minutes.


Exercise and health are matters that vary from person to person. Participants of the daily workout should speak with their doctors about their individual needs before starting any exercise program. This Web site is not intended as a substitute for the medical advice and supervision of your personal physician. Any application of the recommendations set forth in the following pages is at the viewer’s discretion and sole risk. See your physician before beginning any exercise program. This is especially important if your family has a history of heart disease, high blood pressure, high cholesterol, diabetes, arthritis, obesity, cigarette smoking, or other health conditions. If you have any doubts whatsoever, consult your physician. Please submit feedback using our Contact Page.


Original article and pictures take useast-cdn.skinnyms.com site

Monday, November 13, 2017

Yoga Poses to Ease Post-Workout Muscle Soreness

Yoga Poses to Ease Post-Workout Muscle Soreness
importance_flexibility_mobility_fitness

So you killed leg day, but now you can’t even walk to the bathroom without being in pain. Post-workout muscle soreness is both a good thing and a bad thing. It’s a good thing because that indicates that you had a successful, muscle-building workout. Soreness is caused by the micro-tears in the muscles from working really hard. If you are sore, good job! You are building muscle.


Unfortunately, muscle soreness is can also be pretty uncomfortable- even painful- and also quite inconvenient in a lot of situations. If you work out a lot, you are going to be sore all the time, and that’s just no fun.


Here are yoga poses for post-workout muscle soreness. These poses will help ease muscle soreness, as well as increase your mobility & flexibility for your future workouts.


Yoga Poses for Post-Workout Muscle Soreness


Arms:


yoga poses sore muscles post workout

Standing Forward Bend


Clasp your hands together behind your back, hinge forward at the hips, let your head hang, and bring your arms overhead. Sway slowly from side to side, letting the weight of your arms stretch your shoulders at different angles.


yoga poses sore muscles post workout

Standing Side Bend


Stand with your feet together and your arms overhead with your palms together. Keeping your arms straight- or close to straight- lean to the left and right, taking the time to feel your sides open.


yoga poses sore muscles post workout

Wide Legged Forward Bend Twist


Stand with your feet placed 3-4 feet apart, and hinge your torso forward at the hips. “Roll” your spine down and rest your hands on the floor, letting your neck & head relax. Bring one arm upwards and look up at it, feeling your spine twist and open. Switch arms and repeat.


Legs:


yoga poses sore muscles post workout

Standing Forward Bend

Stand with your feet together, and bend over, “rolling” your spine down as you reach towards the floor. Let your neck relax and your head hang.


Reclining Bound Angle Pose


Start in an upright (sitting) Bound Angle Pose (the “butterfly” stretch), then roll your spine back until your are laying down. This will stretch your hip flexors (and ladies take note, this pose is also great for relieving menstrual cramps).


yoga poses sore muscles post workout

Camel Pose (Ustrasana)


Begin on your knees, with your arms at your side, looking straight forward. Slowly draw your arms up over your head, then using one arm at a time, reach your hands behind you to grasp your heels. Make sure your hips are positioned over your knees, then relax your neck and shoulders so your head hangs back and your throat feels “open”.


yoga poses sore muscles post workout

Crescent Lunge


Start in a high lunge, then slowly lower the back knee down to the floor. Keep your torso to an upright position, and make sure your front knee does not extend forward over your toes.


Back:


yoga poses sore muscles post workout

Wind-Relieving Pose


Lay with your back flat on the ground and legs fully extended. Bring both knees in towards your chest, clasp your hands around your legs, and round your back so your buttocks come slightly off the floor. Attempt to bring your forehead to your knees, then rock slowly from side to side to gently massage your spine.


yoga poses sore muscles post workout

Two Knee Spinal Twist


Lay with your back on the ground, and your knees bent. Let your knees fall to one side, and look in the opposite direction, with your arms extended to both sides.


yoga poses sore muscles post workout

Childs Pose


Sit with your knees slightly apart and folded underneath your body, then lean forward to rest your forehead on the ground. Rest with your arms by your sides, or increase the stretch by reaching your arms forward.


yoga poses sore muscles post workout

Plow Pose


From a sitting position, roll your spine backwards and down to the floor, and bring your knees into your chest. Place your hands on your lower back for support as you extend your legs upward towards the ceiling. Finally, lay your arms on the floor when you are stable, lower your legs down towards your face, and aim to touch your toes to the floor above your head.


yoga poses sore muscles post workout

Downward Dog


Stand with your feet together, hinge forward at the hips, and bend your knees so that your palms are flat on the floor (if they aren’t already). Shift your weight so that your arms are supporting you as you hop or walk your legs back. Use your hands to push your body back towards your heels until you feel a stretch throughout your back and legs


Abdomen:


yoga poses sore muscles post workout

Side Plank Pose


Starting from either Plank Pose or Downward Dog (whatever you are more comfortable with) shift your weight to one arm, and rotate your body to the side. Engage your core and lift your hips upwards, and extend your free arm overhead.


yoga poses sore muscles post workout

Sphinx Pose


Lay on your stomach and place your elbows below your shoulders. Prop yourself up on your forearms, taking care to keep your shoulders down and away from your ears.


yoga poses sore muscles post workout

Cobra Pose


Lay on your stomach and place your hands flat on the floor beneath your shoulders. Slowly press up with your arms, straightening them only to the a point that is still comfortable for your back. Take care to keep your hips on the ground, and your shoulders away from your ears.


Videos to improve your mobility & flexibility:


Original article and pictures take 17eu8o3hks9l3pocszejtb1c.wpengine.netdna-cdn.com site